US Digital will be closed on Thurs., Nov. 28, and Fri., Nov. 29 in observance of the Thanksgiving Holiday. We will reopen Mon., Dec. 2 at 6:30 AM PST.

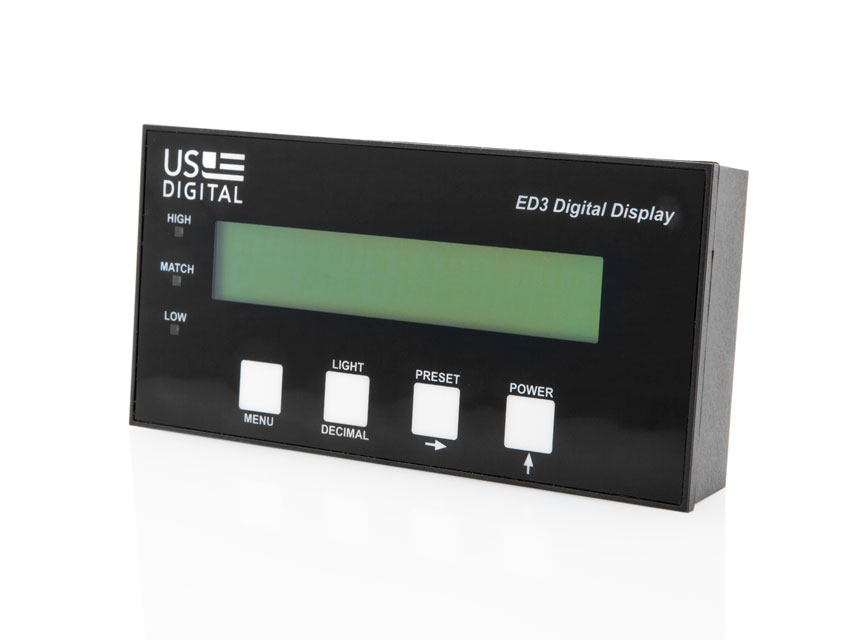
ED3 Digital Encoder Display

ED3 Features

  • Seven 0.5 in. high numeric digits with blue backlight
  • Bidirectional counting, displays signed values from 0.000001 to 9999999
  • Programmable scale factor for output display
  • Three LEDs to indicate High, Match, or Low setpoints
  • Isolated SPDT relay output with programmable set points
  • Digitally filtered counting speed from 0 to 1.2MHz
  • Easy in-the-field programming of modes and parameters
  • Available with a single-ended (S) or a differential (D) interface
  • Supplies +5V power for an external encoder or inclinometer
  • Accepts power supply voltages from +7.5 to +30V

See more info below

Configure the ED3

CE Marking: Starting July 22nd, 2014, some US Digital products will contain the CE Marking. The ED3 will not contain a CE Marking and will not be available for shipping to CE Mark required countries (for example, all countries within the European Union (EU)) after July 10th, 2014. See the Product Change Notification PCN 4464 for more information, or contact a US Digital representative at sales@usdigital.com.

ED3 Product Description

The ED3 is an LCD readout that serves as a position indicator or tachometer. The ED3 can display:

  • Speed or position of a quadrature output incremental encoder
  • Absolute position of an MA3-P/MAE3-P/M3 (PWM output) encoder
  • Number of digital pulse counts, or pulse rate, gated with a direction control

A programmable scale factor can be applied so the ED3 displays the output count or speed in different units such as inches, meters/sec, degrees, etc.

A 12VDC power supply (PS-12) that plugs directly into a 120VAC receptacle, is included with the display.

Product Specifications

APPLICATIONS

  • Quadrature Counter, Tachometer
  • Up/Down Pulse Counter, Frequency Counter
  • Position display
  • Distance display
  • Digital level display
  • Speed zone alarm indicator
  • Digital speed control
  • Programmable tilt switch

ENVIRONMENTAL

PARAMETER MIN. MAX. UNITS
Operating Temperature 0 50 C

OPERATIONAL PARAMETERS

PARAMETER MIN. MAX.
Encoder Resolution (CPR) 1 9999999
Scale Factor 0.000001 9999999
Count Range -9999999 9999999
Display Resolution 0.000001  

ELECTRICAL

PARAMETER MIN. TYP. MAX. UNITS
Supply Voltage +7.5 - +30 (+18 rev. 2.10 and below) Volts
Supply Current*
   With Backlight
   Without Backlight

-
-

75
25

115
35

mA
mA
Encoder Input Cycle Frequency 0 - 1.2 MHz
Relay Contact Rating** - - 3.0 Amps
Relay Switching Rating*** -
-
-
-
125
30
VAC
VDC
Relay Dielectric Strength 500 - - VAC
Relay Contact Resistance - - 0.1 Ohm
Output Voltage to Encoder 4.8 5.0 5.2 VDC
Encoder Supply Current - - 250 mA
Encoder Single-ended Interface
   Low Input
   High Input

-1.0
+2.8

-
-

+2.1
+12.0

VDC
VDC
Encoder Differential Interface
   Minimum Differential Voltage
   Common Mode Voltage
   Input Voltage Range 

200
-7.0
-7.0 

-
-

-
+7.0
+12 

mVDC
VDC
VDC 

* Does not include current drawn by an external encoder.

** At rated AC or DC voltage.

*** An external clamp diode should be used when switching inductive loads.

OPERATING MODE

In normal operating mode, the function of each button is defined by the label located just above the button. When the ED3 first powers up, a Tachometer or Counter Mode label is briefly displayed to indicate the currently configured operating mode.

The display will flash 9999999 for displayed values that are outside of the configured limits of the ED3.

PRELOAD:

In Counter Mode, the encoder index signal, if enabled, or the preset button, if enabled, can preset the display to a preload parameter value.

In Tachometer Mode, if enabled, when the preset button is pressed, the velocities at that instant will be stored as target velocities and the display is set to zero. That target will thereafter be subtracted from the current velocities to display the relative difference above and below that target. Pressing and holding the preset button for three seconds will return to the normal mode of displaying the actual velocities.

Relay:

The internal isolated SPDT relay with field programmable set points is useful for controlling external devices.

In Counter Mode, the ED3 can be configured to activate on one of four conditions: greater than, less than, window, or match count.

In Tachometer Mode, the ED3 can be configured to activate on one of three encoder velocity conditions: greater than, less than, or between.

LEDS:

The High LED turns on when the displayed value is greater than the Hi Set parameter.

The Low LED turns on when the displayed value is less than the Lo Set parameter.

In Counter Mode, if the relay is set to the Match condition, the Match LED turns on when the displayed value is equal to the Match parameter. If the relay is set to the Between condition, the Match LED turns on when the displayed value is between or equal to the Hi Set and Lo Set parameters.

In Tachometer Mode, if the relay is set to the Between condition, the Match LED turns on when the displayed value is between or equal to the Hi Set and Lo Set parameters.

FACTORY DEFAULT CONFIGURATION

COUNTER MODE (DEFAULT MODE)  
Scale Factor: 1
Lo Count (Minimum Number to Display): 0
Hi Count (Maximum Number to Display): 359
= Set (Match): 180
Hi Set: 180
Lo Set: 180
Relay: No
Quad (Quadrature Mode): 1
Ind (Index Enable): Off
Pre (Preset Button Enable): On
Preload Value: 0
Lite (Backlight Default Setting): Off
TACHOMETER MODE  
Dis (Display Tachometer Units): rp60
CPR (Encoder Resolution): 500
Scale Factor: 1
Lo Set: 0
Hi Set: 100
Relay: No
Quad (Quadrature Mode): 1
Abs (Absolute Value Mode): No
Pre (Preset Button Enable): On
Lite (Backlight Default Setting): Off

Factory Reset
To perform a reset of the ED3 parameters to their factory preset values, use the following steps:

  1. Turn the ED3 device off.
  2. While holding down the Preset button, turn the unit back on by pressing and releasing the power button.
  3. The display will now prompt for loading, or not loading, the ED3 factory preset values. The display will allow for selecting “Save Yes” or “Save No”. Use the Up-Arrow button to scroll through the save choices. Use the Menu button to select “Save Yes” to reset the parameters to the factory values; the “Save No” selection will abort the process and not reset the current parameters.

CONFIGURATION MODE

The operating mode and parameters may be changed by pressing and holding the Menu button for 3 seconds; this will place the ED3 into Configuration Mode. In Configuration Mode, the function of each button is defined by the text or symbol written below it:

  • Menu Button: Press (without holding) to scroll through the modes or parameters to change.
  • Decimal Button: Enables or disables the decimal point of numeric values at the current cursor position.
  • Right Arrow Button: Moves the cursor to the right one digit at a time when a numeric parameter is selected.
  • Up Arrow Button: Scrolls through the available values for the selected parameter.

The ED3 has two sets of parameter tables, one for Counter Mode and one for Tachometer Mode. Changing the Counter Mode parameters does not affect the Tachometer Mode parameters and vice versa. Saved parameters can be either viewed or changed. Upon entering Configuration Mode, the Menu button scrolls through the two mode choices: Tach or Counter. Press the Up Arrow button to select the desired mode. The ED3 will then present the first parameter for that mode. Parameters are explained in detail in the Menu Settings section of this datasheet.

Please Note:
  • The far left digit of the display is the sign digit.
  • Entering a negative Scale parameter is equivalent to reversing the count direction of the encoder or inclinometer.
  • The displayed resolution is rounded (not truncated) to the range resolution defined by the Lo Count/Hi Count or Lo Set/Hi Set parameters.  See these parameter settings for details.

Configuration Mode may be exited at any time by pressing and holding the Menu button for three seconds. The following exit menu choices will be displayed:

  • SAVE Yes - Changes are saved permanently to nonvolatile memory.
  • SAVE No - All changes are abandoned.
  • SAVE TST - Changes are temporarily saved to RAM for as long as the ED3 remains powered on.

Press the Up Arrow to scroll through the exit choices. Press the Menu button to execute the exit choice.

All parameters are checked when an attempt is made to save the configuration parameters. If a non-valid entry is detected, an error code (below) is displayed and must be corrected before the settings can be saved.

  • Error 1 - Counter Mode range error: The Lo Count is set higher than Hi Count.
  • Error 2 - Tachometer Mode parameter error: The Lo Set is set higher than the Hi Set.
  • Error 3 - The Scale Value parameter is set to zero. The ED3 will always display zero. Set the Scale Value parameter to a non-zero number.
  • Error 4 - PreLoad count value is outside the Lo Count and Hi Count range.

TYPICAL INPUT CIRCUIT

SINGLE-ENDED:

DIFFERENTIAL:

COUNTER MENU SETTINGS

SCALE FACTOR

The internal counter values are multiplied by this factor to display numbers in more meaningful user units. A negative scale factor (minus sign in the left-most digit) will reverse the count direction. A decimal point may be placed by using the Decimal and Right Arrow buttons. Use any non-zero number.

NOTE: The Scale Factor resolution has no effect on the displayed resolution. For the PWM encoders, the Scale Factor selection is limited to +1 or -1; the sign will reverse the count direction.

LO COUNT (MINIMUM NUMBER TO DISPLAY)

The valid display range of the ED3 is set by the Lo Count and Hi Count parameters. The Lo Count defines the smallest number to be displayed. Any positive, negative, decimal, or integer number may be entered. If the displayed number attempts to go below Lo Count, the ED3 counter will rollover to the maximum number defined by Hi Count.

NOTE: Placement of the decimal point in HI Count or Lo Count controls the number of decimal digits actually displayed during operation. The HI Count or Lo Count resolution can't be set any finer than the Scale Factor resolution.

HI COUNT (MAXIMUM NUMBER TO DISPLAY)

The valid display range of the ED3 is set by the Lo Count and Hi Count parameters. The Hi Count defines the largest number to be displayed. Any positive, negative, decimal, or integer number may be entered. If the displayed number attempts to go above Hi Count, the ED3 counter will rollover to the minimum number defined by Lo Count. Hi Count must be a greater number than Lo Count.

NOTE: Placement of the decimal point in HI Count or Lo Count controls the number of decimal digits displayed during operation. The HI Count or Lo Count resolution can't be set any finer than the Scale Factor resolution.

= SET (MATCH)

The Match LED will be lit whenever the display number matches this value. If the Relay Mode is set to = (Match), the Relay will be energized. Any positive, negative, decimal, or integer number may be entered. To disable the match condition, set =Set outside of the display range (Hi Count).

HI SET

The High LED will be lit whenever the display number is greater than this value. If the Relay Mode is set to Hi, the Relay will be energized. If the Relay Mode is set to Bt (Between), the Relay will be energized and the Match LED will light when the display number is >=Lo Set and <=Hi Set. To disable this condition, set Hi Set greater than the display range (>Hi Count).

LO SET

The Low LED will be lit whenever the display number is less than this value. If the Relay Mode is set to Lo, the Relay will be energized. If the Relay Mode is set to Bt (Between), the Relay will be energized and the Match LED will light when the display number is >=Lo Set and <=Hi Set. To disable this condition, set Lo Set less than the display range (< Lo Count).

RELAY

The relay can be energized when the following conditions occur:

  • No Never
  • Hi When the display number is >Hi Set
  • Lo When the display number is <Lo Set
  • Bt (Between) When the display number is >=Lo Set and <=Hi Set
  • = When the display number is equal to =Set (Match)

MODE

The following choices are available:

  • Quad 1
  • Quad 2
  • Quad 4
  • Step Dir (Step and Direction)
  • P-Ratio (PWM)

Quad 1 will cause the ED3 to count once per quadrature cycle (X1 mode), Quad 2 will count twice per quadrature cycle (X2 Mode) and Quad 4 will count four times per quadrature cycle (X4 mode). Step Dir will count digital pulses at input A; the count direction is controlled by input B (B=0 selects up count, B=1 selects down count - Input B may switch state only when input A = 1). P-Ratio will enable the device to read the PWM output of the MA3, MAE3 or M3.

Example: If the ED3 receives 360 quadrature cycles, Quad 1 will generate 360 increments, Quad 4 will generate 1440 increments.

IND (INDEX ENABLE)

When an index input is asserted to a high logic level, this parameter provides the following choices:

  • On: Preset the displayed value to the PreLoad parameter.
  • Off: Ignore the index input.

Note: This parameter does not apply to PWM encoders.

PRE (PRESET BUTTON ENABLE)

When the Preset Button is pressed, this parameter provides the following choice:

  • On: Preset the displayed value to the PreLoad parameter.
  • Off: Ignore the Preset Button.

PRELOAD VALUE

The displayed value will be changed to this value when the preset button is enabled and asserted, or the index signal is enabled and asserted. Any positive, negative, decimal, or integer number may be entered. Be sure to enter a value >=Lo Count and <=Hi Count.

LITE (BACKLIGHT DEFAULT SETTING)

When the ED3 first powers on, the backlight will automatically be turned on if this parameter is set to On, or Off if this parameter is set to Off. This parameter does not affect the front panel backlight button. It is always enabled and will toggle the backlight on or off.
TACHOMETER MENU SETTINGS

DIS (DISPLAY TACHOMETER UNITS)

Four tachometer display units can be selected:

  • RP60 (RPM) Revolutions per Minute
  • RP1 (RPS) Revolutions per Second
  • CP60 (CPM) Counts per Minute
  • CP1 (CPS) Counts per Second

CPR

Enter the resolution (CPR) of the external encoder, full quadrature cycles per revolution.
This must be a positive integer value.

SCALE FACTOR

Set this number to 1 if the encoder to shaft ratio is 1:1, the encoder resolution has been entered, and the above units are desired. Other values can be entered for other situations such as compensation for gearing between the shaft and the encoder. The velocity is multiplied by this factor to display numbers in more meaningful user units.

A negative scale factor (minus sign in the left-most digit) will reverse the displayed velocity. If desired, a decimal point may be placed by using the Decimal and Right Arrow buttons. Use any non-zero number.

NOTE: The Scale Factor resolution has no effect on the displayed resolution.

HI SET

The High LED will be lit whenever the display velocity is greater than this value. If the Relay Mode is set to Hi, the Relay will be energized. If the Relay Mode is set to Bt (Between), the Relay will be energized and the Match LED will light when the display velocity is >=Lo Set and <=Hi Set. To disable this condition, set Hi Set greater than the highest attainable velocity.

NOTE: Placement of the decimal point in HI Set or Lo Set controls the number of decimal digits displayed during operation. The HI Set or Lo Set resolution can't be set any finer than the Scale Factor resolution. Encoder CPR and requested display resolution will affect the display update time.

LO SET

The Low LED will be lit whenever the display velocity is less than this value. If the Relay Mode is set to Lo, the Relay will be energized. If the Relay Mode is set to Bt (Between), the Relay will be energized and the Match LED will light when the display velocity is >=Lo Set and <=Hi Set. To disable this condition, set Lo Set less than the lowest attainable (or negative) velocity.

NOTE: Placement of the decimal point in HI Set or Lo Set controls the number of decimal digits displayed during operation. The HI Set or Lo Set resolution can't be set any finer than the Scale Factor resolution. Encoder CPR and requested display resolution will affect the display update time.

RELAY

The relay can be energized when the following conditions occur:

  • No Never
  • Hi When the display number is >Hi Set
  • Lo When the display number is <Lo Set
  • Bt (Between) - When the display number is >=Lo Set and <=Hi Set

MODE

The following Mode choices are available:

  • Quad 1
  • Quad 2
  • Quad 4
  • Step Dir (Step and Direction)

Quad 1 will cause the ED3 to count once per quadrature cycle (X1 mode), Quad 2 will count twice per quadrature cycle (X2 Mode) and Quad 4 will count four times per quadrature cycle (X4 mode). The Step Dir mode will accept non-quadrature pulses on the A input; the count direction is controlled by the B input (Input B may switch state only when input A = 1). The Step Dir mode is only valid when the CP1 and CP60 display output is selected.

Examples: If the ED3 receives 360 quadrature cycles, Quad 1 will generate 360 increments, Quad 4 will generate 1440 increments. In the Counts-Per-Time modes (CP1, CP60), the displayed rotational velocity in Quad 4 will be 4 times that of Quad 1; in the Revolutions-Per-Time modes (RP1, RP60), the displayed velocity will be calculated using Quad 4 mode only (other counting modes are ignored).

ABS (ABSOLUTE VALUE MODE)

The "Yes" selection will display all velocities as positive numbers regardless of the shaft direction. The "No" selection will display positive velocities in one direction and negative in the other.

PRE (PRESET BUTTON ENABLE)

When the preset button is pressed the velocities at that instant will be stored as target velocities and the display set to zero. That target will thereafter be subtracted from the current velocities to display the relative difference above and below that target. Pressing and holding the preset button for three seconds will return to the normal mode of displaying the actual velocities.

LITE (BACKLIGHT DEFAULT SETTING)

When the ED3 first powers on, the backlight will automatically be turned on if this parameter is set to On, or Off if this parameter is set to Off. This parameter does not affect the front panel backlight button. It is always enabled and will toggle the backlight on or off.
INSTALLATION INSTRUCTIONS

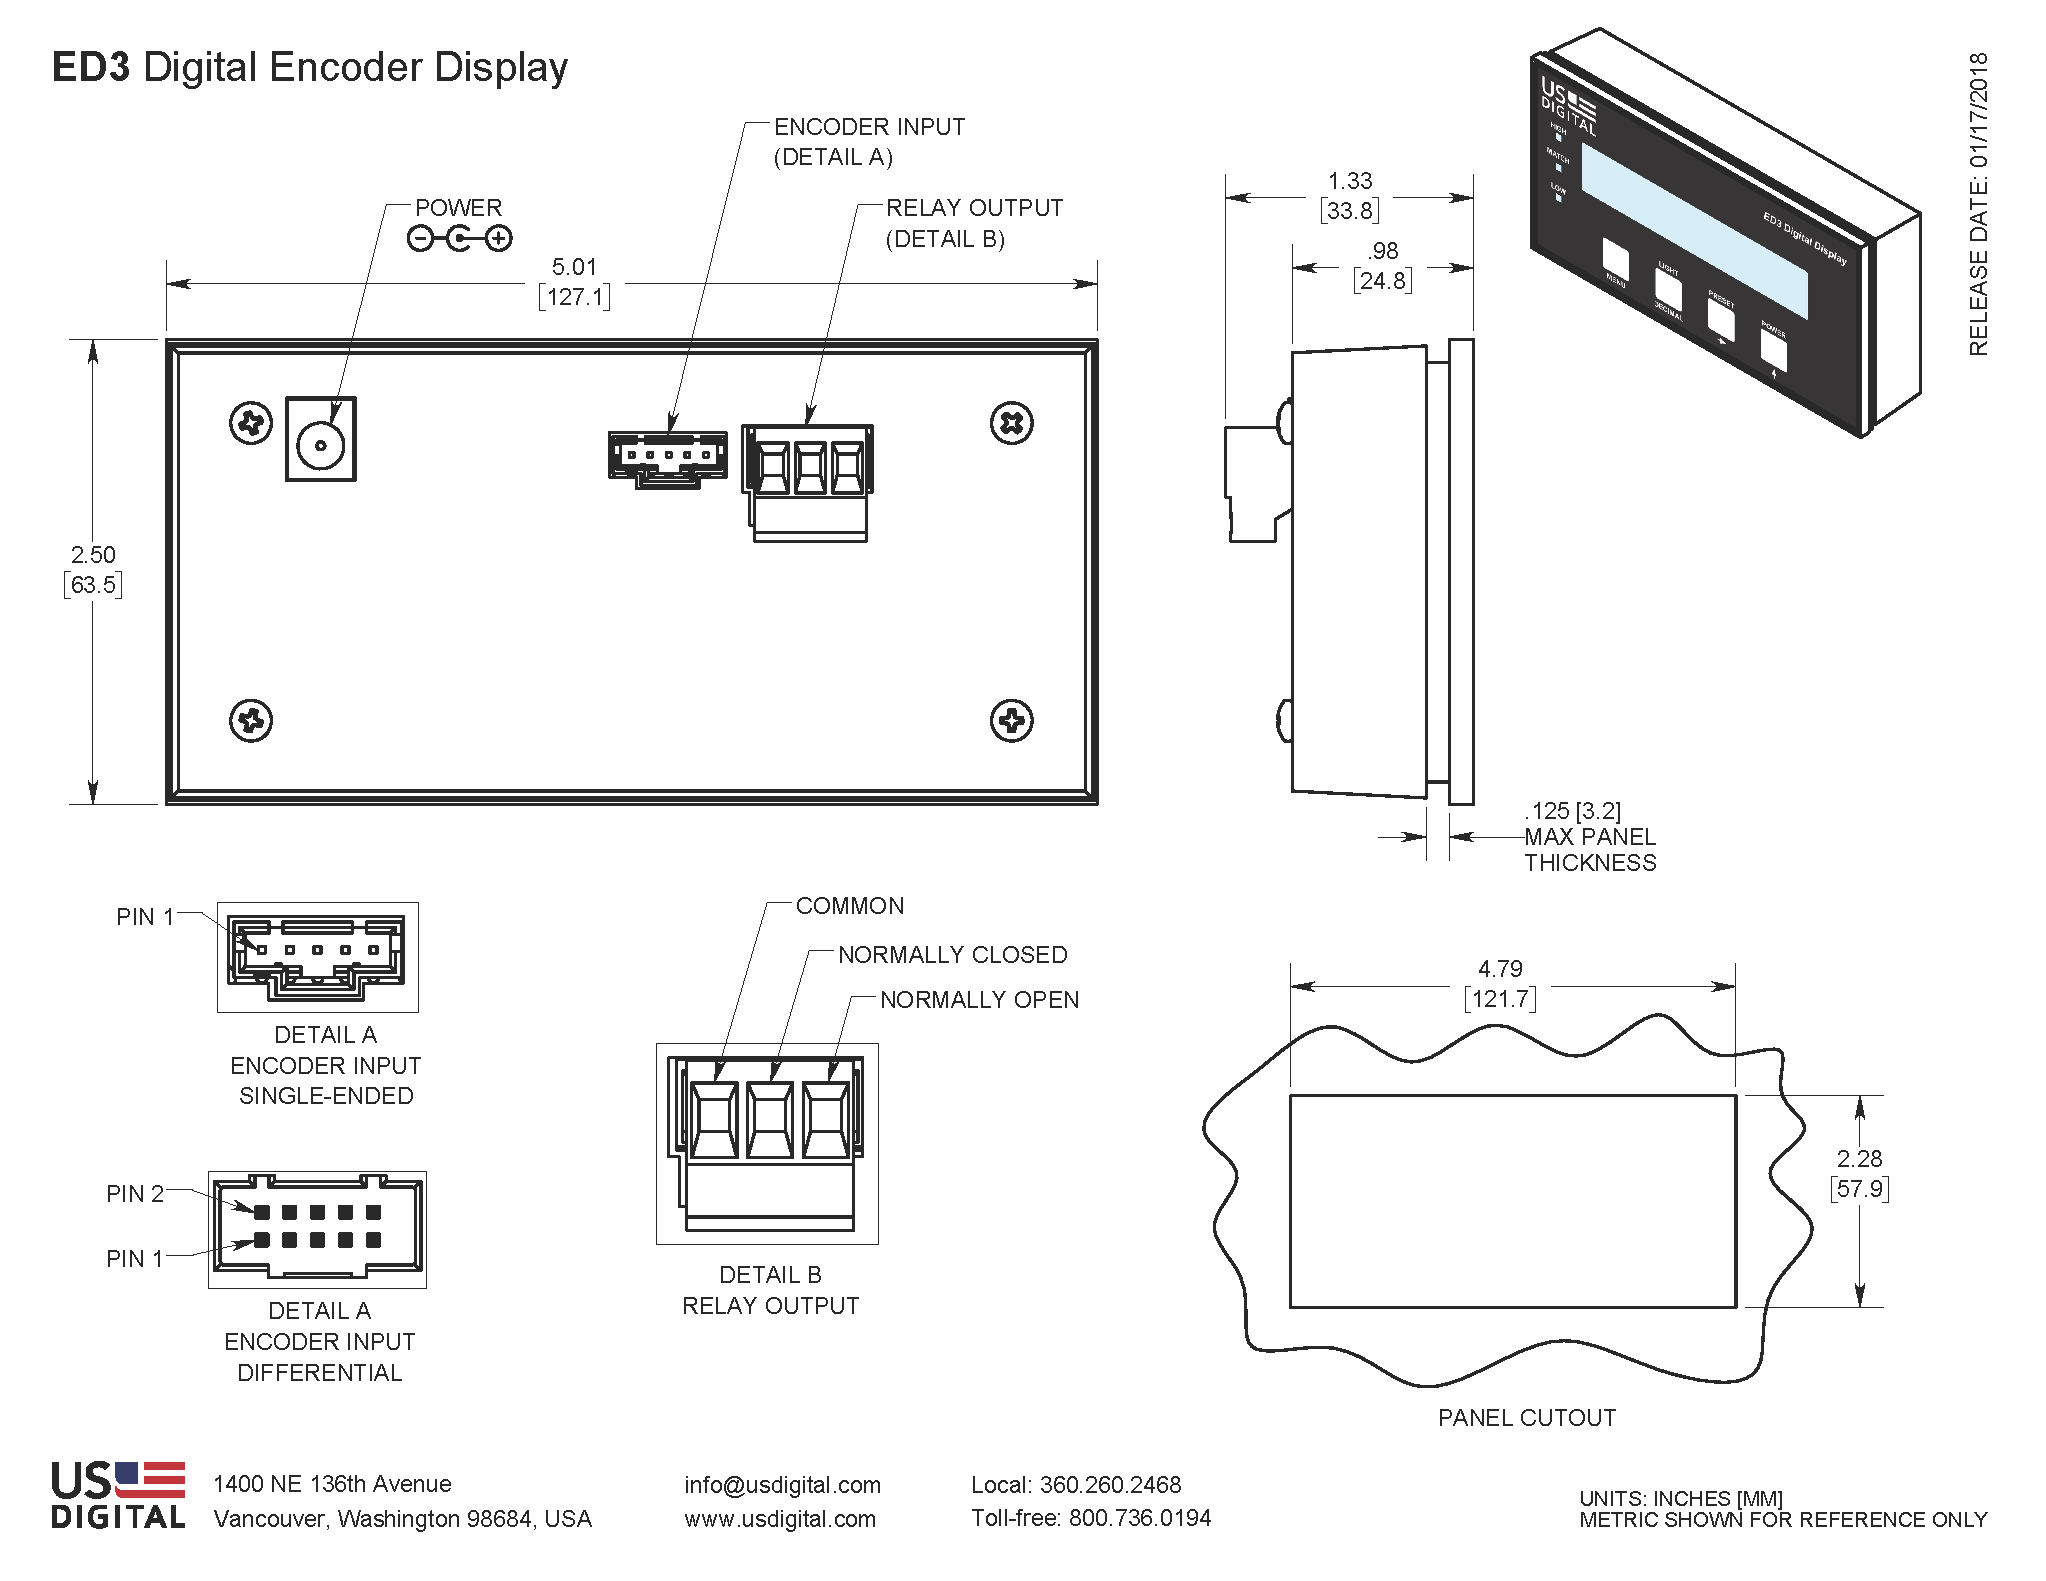
  1. Remove the rear cover by removing the four screws in the back.
  2. Insert the display through the rectangular opening in the front panel so that the gasket seals against the front.
  3. Reassemble the rear cover to secure the display into the front panel.

MATERIALS

Housing Glass filled polycarbonate
Front Window Lexan

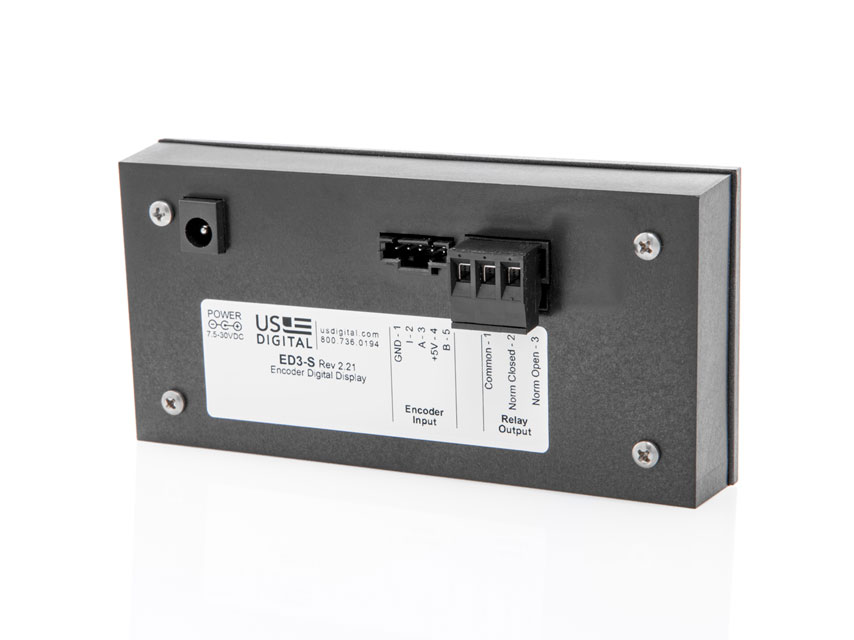
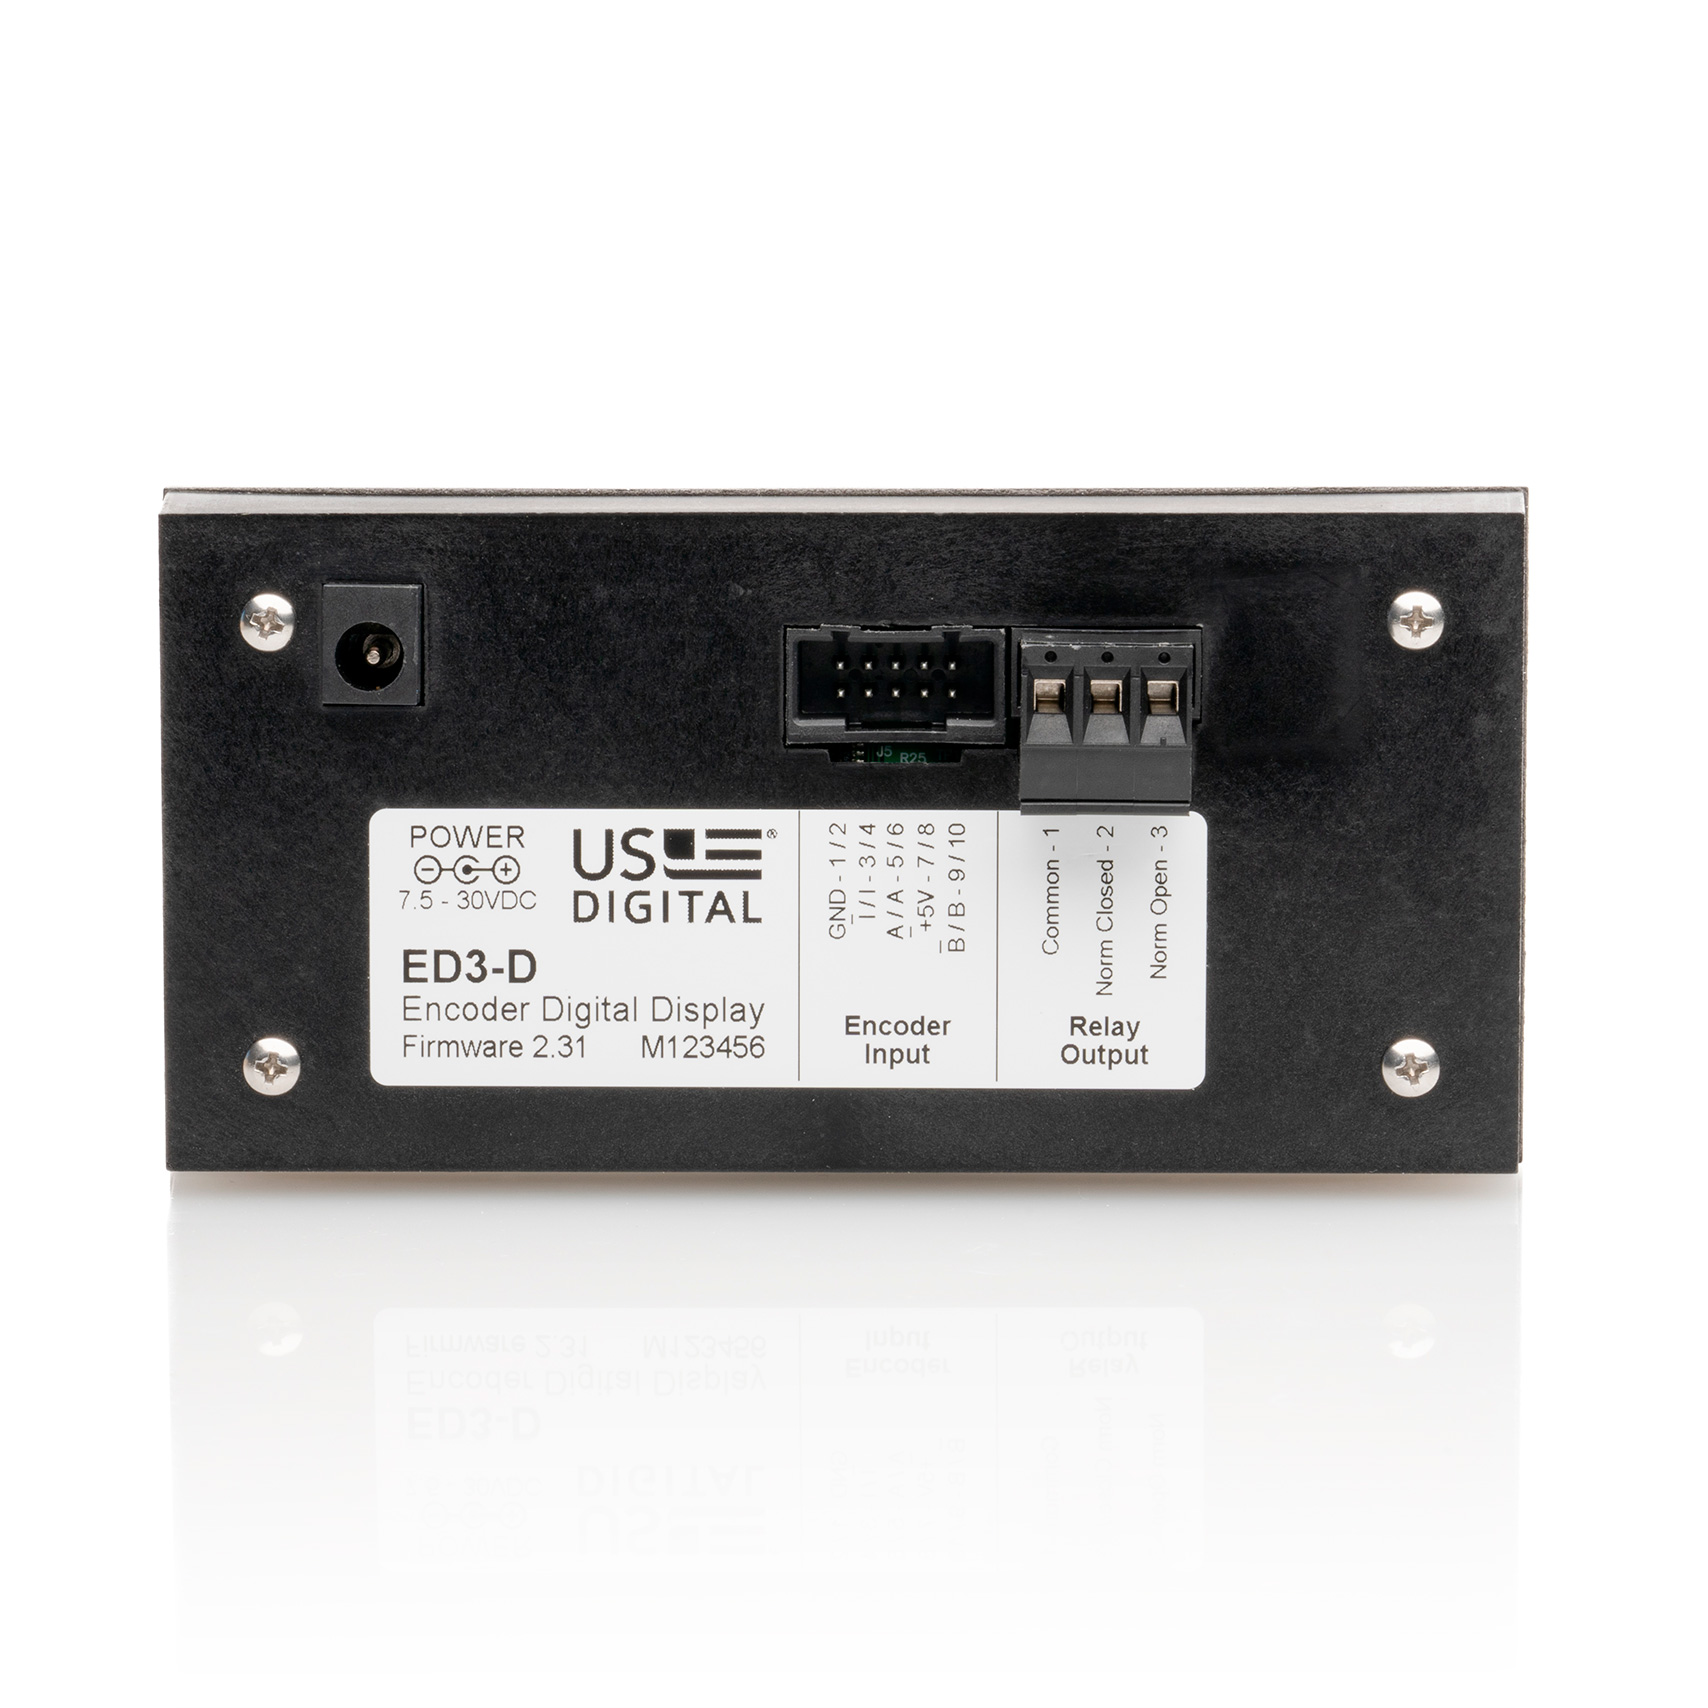
ENCODER CONNECTOR PINOUT

PIN 5-PIN SINGLE-ENDED 5-PIN PWM 10-PIN DIFFERENTIAL
1 Ground Ground Ground
2 Index N/C Ground
3 A channel PWM Index-
4 +5VDC power +5VDC Power Index+
5 B channel N/C A- channel
6     A+ channel
7     +5VDC power
8     +5VDC power
9     B- channel
10     B+ channel

FIRMWARE VERSION

To view the firmware version of the ED3, use the following steps:

  • Turn the unit off.
  • While holding down the Menu button, turn the unit back on by pressing the Power button.
  • Firmware version number will flash on screen for a few seconds until unit enters normal operation mode.

PRODUCT CHANGE NOTIFICATIONS

Title Date Description Download
PCN 7163 - ED3 Firmware Update 6/25/2021

As part of our ongoing continuous improvement efforts, US Digital is implementing a firmware change to the ED3 Digital Encoder Display.
Firmware version 2.30 includes the following updates:

  • Supports up to 2kHz PWM, as available on the new M3K series of magnetic encoders.
  • Ability to return all parameters to the original factory settings.

Part Numbers Affected:

  • ED3-S, ED3-D
Download
PCN 4464 - CE - RoHS 6/30/2014

US Digital is aware of the increasing attention to world-wide environmental regulations, specifically with regard to the need for hazardous substance restrictions in electronic components and systems. As of July 10th, 2014 US Digital will now be CE Marking certain products inline with compliance under RoHS Directive (2011/65/EU). In order to achieve RoHS Compliance, the products will not contain more than the acceptable levels of the listed restricted substances within the RoHS 2011/65/EU directive.

Part Numbers Affected:

  • ED3
  • USB4
  • QSB
  • SEI-USB
  • MD2S
  • PS-5, PS-12, PS-24, PS-48 (Power Supplies)
  • PE

For the part numbers listed above, US Digital cannot confirm that they meet Low-Voltage and EMC Directives and for that reason US Digital cannot support shipping those products / product families into the CE required countries (For Example countries in the EU). Those products can still be shipped to Non-CE required countries with a Statement of Material Conformance to the RoHS Directive 2011/65/EU, in place of a RoHS Compliance Declaration.

Download

Additional Information

Product Notes

  • US Digital® warrants its products against defects in materials and workmanship for two years. See complete warranty for details.

Datasheets

User Guides

Related


Product Configurator

For pricing, this product requires configuration.

Begin by completing either Option 1 or 2 below. Questions? Contact our support team.

Option 1: Configure the Product

Use the configuration tool to provide information regarding your product needs. Not sure what to do or need additional assistance? Our support team is here to help.

We recommend enabling Javascript when using the product configurator.

Option 2: Enter the Product Part Number Directly

If you know your product part number, enter it in the following field. The part number format looks something like this: E5-5000-394-IE-S-D-D-3...


Our products are not currently available for direct online purchase. To place an order please contact us directly with your part number.

For purchasing or volume discounts, please configure the part above, then use the completed part number and contact us!


Feedback

US Digital's mission is a commitment to quality and constant improvement. If you find an error to a product on this page, please let us know!

Compare Items (Max 3):